


By using our website, you agree to the use of cookies as described in our Cookie Policy
Blog
Subway Tiles: The Classic Choice That Never Goes Out of Style

Deep Dive · Tile
Subway Tile: The Classic Choice (And How to Make It Your Own)
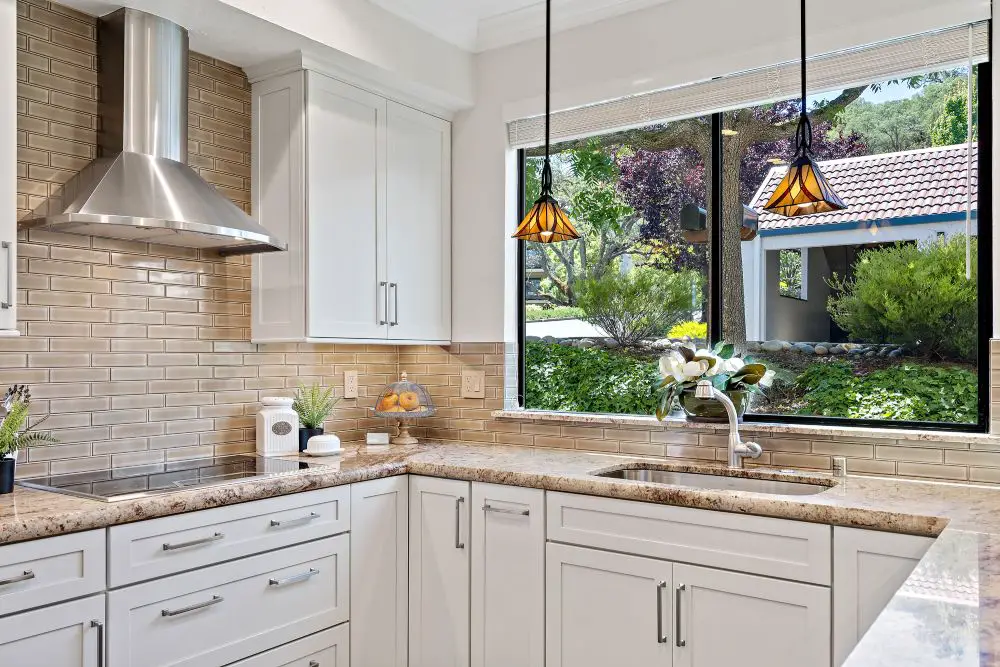
A bright kitchen featuring a classic subway tile backsplash in a warm beige tone. The glossy finish reflects natural light, while the clean horizontal layout highlights the timeless appeal of subway tile in modern kitchen design.
There's a reason subway tile has been on walls since 1904 and is still the first thing half our clients point to on their inspiration boards. It's not trendy. It's not boring. It's the rare design choice that looks right in a Victorian cottage, a mid-century Rossmoor condo, and a brand-new open-concept kitchen — all at once.
But here's what we've learned after setting thousands of square feet of it across the East Bay: "subway tile" is a category, not a decision. The 3×6 white ceramic you're picturing is one of about fifty versions of this tile, and the choices you make — size, material, finish, pattern, grout — have more impact on the final room than most people realize when they're standing in the showroom.
So let's actually talk through it.
Where It Came From (And Why That Matters)
Subway tile was born in 1904, when architects George Heins and Christopher LaFarge were hired to design the first New York City subway stations. They needed something that was cheap, hygienic, easy to clean, and able to reflect light in dark underground tunnels. They landed on a 3×6 inch white ceramic rectangle with a glossy glaze — and it worked so well that the look spread from transit stations into butcher shops, bakeries, and eventually residential kitchens and bathrooms across the country.
What makes that origin story relevant today: the tile wasn't designed to be beautiful. It was designed to be functional. The beauty came from the precision of the installation — tight, even grout lines, clean horizontal courses, nothing to distract from the geometry. That's still what makes a subway tile installation sing or fall flat in 2026. The tile itself is almost secondary.
"We've seen the same 3×6 white ceramic look incredible and look terrible on jobs that cost exactly the same amount. The difference was always in the prep work and the setting. The tile doesn't do the heavy lifting. The installer does."
Size Changes Everything
Most people default to 3×6 — the original — without realizing there's a whole vocabulary of sizes that read very differently on a wall. Here's what we actually see in the field and what each size does.
| Size | 3×6 (Classic) | 4×8 (Modern) | 2×8 (Elongated) | 3×12 (Jumbo) |
|---|---|---|---|---|
| Grout lines | Traditional, visible pattern | Fewer lines, cleaner look | Long horizontal lines, graphic | Very few lines, nearly seamless |
| Best for | Any space; classic kitchens and bathrooms | Larger modern kitchens; open-concept | Shower walls; feature walls | Large-format showers; contemporary baths |
| Small bathroom? | ✓ Great — scaled right | ● Fine if space is ≥ 50 sq ft | ✓ Works well vertically | ✗ Can overwhelm small spaces |
| Installation complexity | Standard | Slightly higher — flat substrate critical | Standard to moderate | Higher — heavier, harder to hang vertically |
| Maintenance | More grout to clean | ✓ Less grout, easier | Medium | ✓ Least grout to clean |
| Toupin recommendation | Timeless; can't go wrong | Best for Walnut Creek full kitchen remodels | Great for Rossmoor shower walls | Primary baths with strong design vision |
Trade Term Explained
Field tile: The main body tile that covers most of the wall area — as opposed to trim, border, or accent tiles. When people say "subway tile," they're almost always referring to the field tile. Trim tile: Specialty pieces — bullnose edges, pencil liners, quarter-rounds — used to finish the edges of a tile installation cleanly. Don't skip the trim. An installation that ends in a raw tile edge instead of a finished bullnose is one of the most common shortcuts we see on budget jobs, and it shows.
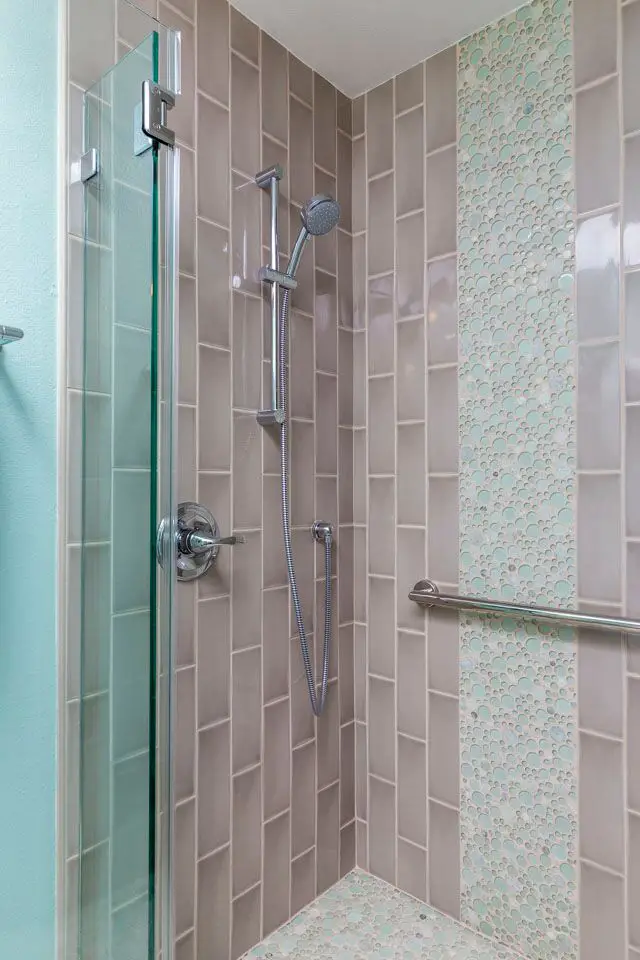
This modern shower design uses vertically stacked subway tiles paired with a textured mosaic accent strip. The vertical orientation adds height and visual interest, offering a contemporary twist on traditional subway tile.
Material: What's Actually Under That Glaze
Not all subway tile is created equal under the surface — and in the East Bay climate, material choice matters more than in drier regions. Here's the breakdown.
Ceramic
The original and still the most common. Made from clay, fired at lower temperatures, and typically less expensive than its cousins. Ceramic is great for kitchen backsplashes and bathroom walls. Where it has limits: it's more porous than porcelain, so in high-moisture shower environments without proper waterproofing behind it, you can get issues down the line. Also more prone to chipping than porcelain on edges and corners.
Porcelain
Fired at higher temperatures than ceramic, which makes it denser, harder, and less porous. If you look at a broken piece of porcelain, the color goes all the way through — it's not just a surface treatment. This matters in showers and wet areas where moisture penetration is a real concern. We specify porcelain over ceramic in any shower installation for exactly this reason. It costs more. It's worth it.
Trade Term Explained
Water absorption rate: The industry measure for how much moisture a tile can absorb. Porcelain has a water absorption rate of ≤0.5% (per ANSI A137.1 standards) — essentially impervious. Standard ceramic runs 3–7%. In a dry kitchen backsplash, this difference doesn't matter much. In a shower that's in use twice a day, it's the difference between a 20-year installation and a problem in five. ANSI A137.1: The American National Standard for ceramic tile — the industry spec that defines categories like impervious, vitreous, semi-vitreous, and non-vitreous. Your tile box will typically list this rating.
Glass
Looks luminous, reflects light beautifully, and adds a depth that ceramic can't match. The trade-off: glass is unforgiving of an imperfect substrate and installer error. Any unevenness in the wall behind it will show through. Any thinset with color variation will ghost through. Setting glass tile requires a specific white thinset and a flat, true wall — not something to attempt on an older Rossmoor condo wall without doing serious prep first. When done right, though, it's stunning.
Natural Stone
Marble subway tile in particular has had a long run in primary bathrooms. It's beautiful. It also requires sealing, is susceptible to acidic cleaners, and will etch if you're not careful with what touches it. In our experience, homeowners who love how marble looks don't always love how much they have to think about it. Be honest with yourself about maintenance before you commit.
Pattern: The Decision Most People Don't Take Seriously Enough
The pattern you choose changes the whole personality of the tile — same 3×6 white ceramic, completely different room. This is where the real design happens.
Running Bond (½ Offset)
The original, and still the best
Each row is offset by half the tile length — exactly how bricks are laid. This is the classic subway look. Horizontal, balanced, timeless. Works in every room, every style. If you're not sure, this is almost always the right call.
TraditionalTransitionalEasiest to install
Stacked (Grid / Jack-on-Jack)
Modern, crisp, unforgiving
Tiles aligned perfectly vertically and horizontally — no offset at all. Creates a contemporary grid pattern that reads as intentionally modern. Harder to install because any variation in grout joint width is immediately obvious. Requires a very skilled setter.
ContemporaryMinimalistInstaller skill matters
Herringbone
The most dramatic of the classics
Tiles set at 45-degree angles in a V-shape zigzag. Instantly elevates a backsplash or shower wall from background to focal point. Requires more cuts, more waste, and more setting time — plan for 15–20% more tile than a running bond. Worth every bit of it in the right space.
Traditional & ModernMore cutsFocal point
Vertical Stack
The underused secret weapon
Running bond rotated 90 degrees — tiles set vertically instead of horizontally. The effect is dramatic: walls feel taller, showers feel more substantial, backsplashes feel architectural. Particularly effective in Rossmoor bathrooms with lower ceilings, where adding visual height is worth everything.
Adds visual heightLow ceilingsUnderrated
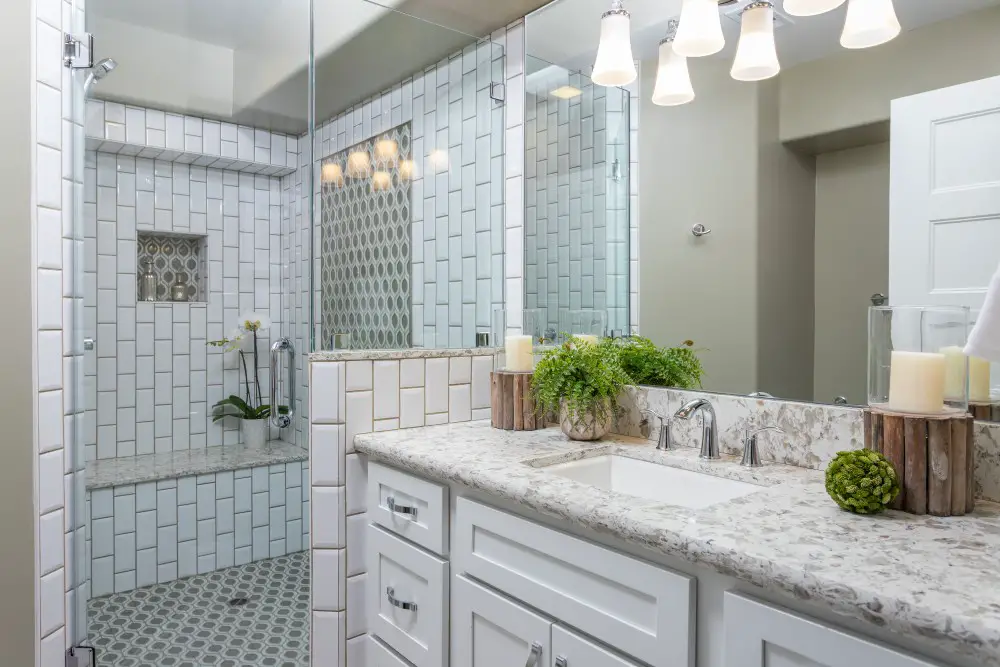
A spacious bathroom showcasing a subway tile shower with a built-in bench and recessed niche. The clean lines of the tile combined with functional features create a stylish and practical space.
The Grout Conversation Nobody Wants to Have
Grout is the most important decision most homeowners treat as an afterthought. It determines whether your subway tile installation looks intentional or not — and it determines how much work you're going to do cleaning it for the next twenty years.
Color: Match vs. Contrast
White tile with white grout is a near-seamless look — the grout almost disappears and the tile reads as one continuous surface. Elegant. Very clean. Shows any dirt or mildew immediately. High maintenance in a kitchen.
White tile with dark gray or charcoal grout is the classic farmhouse look — graphic, bold, emphasizes the pattern. Very forgiving of dirt and cooking splatters. Also means you're committing to that high-contrast aesthetic for the life of the tile, so make sure you love it.
White tile with a warm greige grout is what we find ourselves recommending most often for East Bay homes — it has the warmth of contrast without being as aggressive as charcoal, and it hides the calcium deposits and hard water residue that are inevitable in Walnut Creek's moderately hard water supply.
Trade Term Explained
Sanded vs. unsanded grout: Sanded grout contains fine sand particles, which makes it stronger and better for wider joints (⅛" or more). Unsanded grout is smooth and used for narrow joints (under ⅛"). Using the wrong type for your joint width causes cracking. Epoxy grout: A two-part grout made from epoxy resin instead of cement — extremely stain-resistant, nearly impervious to moisture, and increasingly what we specify for kitchen backsplashes behind stoves. The downside: it's harder to work with and must be installed correctly the first time. Once it cures, it doesn't come out. Grout sealer: A liquid applied over cured grout to reduce staining and moisture absorption. Not optional in shower applications. Reapply annually.
Joint Width: Skinny vs. Traditional
A 1/16" grout joint (very tight, nearly invisible) reads as modern and sleek. A 1/8" joint is traditional and emphasizes the grid. Larger joints — 3/16" or more — are generally a mistake on standard subway tile and look unfinished. Whatever width you choose, it needs to be perfectly consistent across the entire installation. Inconsistent joints are the most common sign of an amateur installation, and they cannot be fixed without pulling the tile.
"The grout is 20% of the material cost and 80% of the visual impact. We've seen beautiful tile ruined by lazy grouting, and we've seen simple 3×6 white ceramic look like a million dollars because the joints were perfectly even and the grout color was exactly right."
Installation: What the Box Doesn't Tell You
Subway tile looks straightforward to install. It's not. Here are the three things that separate a professional installation from a weekend project that you'll be looking at differently in six months.
The Substrate Has to Be Right
Tile is only as good as what's behind it. In shower applications, cement board or an uncoupling membrane — think of it as a flexible, waterproof underlayer — needs to go behind the tile before a single piece goes up. In kitchen backsplash applications, the wall surface needs to be flat, plumb, and primed. We've opened up walls in Rossmoor kitchens and found tile set directly on drywall that had absorbed moisture for fifteen years. The tile looks fine from the front until the wall starts to fail behind it.
Trade Term Explained
Cement board: A rigid backer panel made of cement and fiberglass mesh — water-resistant and dimensionally stable under tile in wet areas. The standard go-to for shower walls and tub surrounds. Uncoupling membrane: A thin, flexible mat (Schluter's DITRA is the best-known brand) that is installed between the subfloor or wall and the tile. It "uncouples" the tile from the structure beneath, allowing the house to move without cracking the tile. We specify this under tile floors almost universally. Thinset mortar: The adhesive that bonds tile to the substrate. Not all thinsets are the same — glass tile needs white thinset, large-format tile needs a modified thinset with higher coverage. The wrong thinset for the application will fail.
Layout Planning Comes First
Before the first tile goes up, a good installer maps out the full layout on paper — or on the wall in chalk lines. The goal is symmetry: the tile should be centered on the focal point of the wall (usually the range or the main shower wall), so that the cuts at each edge are equal and intentional. Walking into a kitchen where the backsplash has a 2-inch sliver of tile on one side and a full tile on the other is one of those things that, once you see it, you can't unsee. That's a layout that wasn't planned.
Cuts at Corners and Obstacles
Every outlet, switch, window, and fixture is an obstacle that requires a precise cut. Budget tile installers make rough cuts and hide them under oversize outlet covers. Our standard is tight cuts that let standard plates sit flush. In a herringbone or stacked pattern, this requires a wet saw, patience, and experience. It's slow. It's worth it.
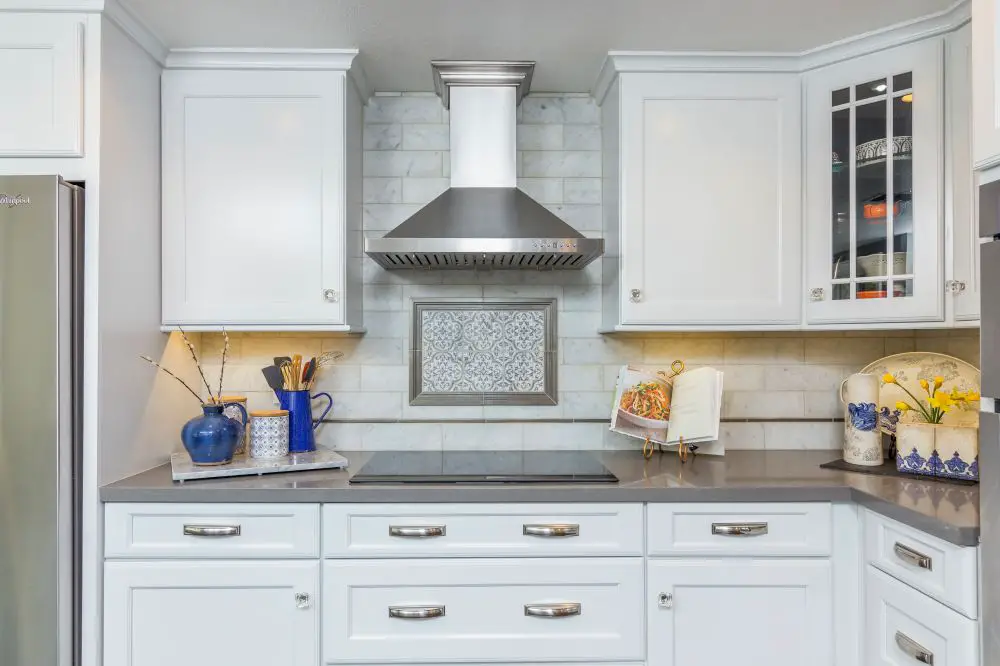
A timeless kitchen design featuring a white subway tile backsplash complemented by a decorative inset behind the stove. This look demonstrates how subway tile can be elevated with subtle accents while maintaining a clean, classic aesthetic.
What We Recommend for East Bay Homes
After four decades of tile installations across Walnut Creek, Rossmoor, Alamo, Danville, and Lafayette, here's the honest shortlist of what works in this market.
Toupin's Subway Tile Recommendations for East Bay Homes
- Kitchen backsplash, classic look: 3×6 white ceramic in a running bond, greige or warm gray grout, epoxy if behind the range. Handles the East Bay's hard water deposits better than bright white grout.
- Kitchen backsplash, modern look: 4×8 or 4×12 white or light gray porcelain in a stacked pattern. Fewer grout lines means less cleaning, and it reads as intentionally contemporary rather than default.
- Rossmoor shower walls: 3×6 or 2×8 porcelain (not ceramic — moisture matters) in a running bond or vertical stack. Vertical is particularly effective in lower-ceiling condos because it adds visual height.
- Feature shower wall or backsplash accent: Herringbone in a 2×4 or 3×6 tile. Use it on one wall, not all four — a herringbone feature wall surrounded by running bond field tile is one of the most universally loved combinations we install.
- Grout color for East Bay homes: Greige or warm gray over bright white. Hard water deposits are real, and white grout in a Walnut Creek shower will require more maintenance than most homeowners anticipate.
- Always seal: Epoxy grout in kitchens, sealed cement grout everywhere else, reapplied annually in showers. Non-negotiable.
If you're planning a kitchen or bathroom remodel and tile is part of the conversation, take a look at our kitchen remodeling page and our bathroom remodeling page to see what full projects look like from start to finish. And our portfolio has real before-and-afters from East Bay homes that show what's possible when the tile and the installation are both done right.
Choosing Tile for Your Kitchen or Bathroom?
We're happy to walk through material, pattern, and grout options with you — and show you real examples from East Bay jobs before you commit to anything.
Get a Free Quote Call Us: 925-937-4200
Toupin Construction
Ready to start your remodel?
Whether you're dreaming of a new kitchen, a spa-worthy bathroom, or a whole-home transformation — we’d love to hear about your project. Reach out and let's talk.
‹ Back
Comments