


By using our website, you agree to the use of cookies as described in our Cookie Policy
Blog
Remodeling for the Long Haul (Aging in Place)

Accessibility & Aging in Place · Bathroom · Kitchen
Remodeling for the Long Haul
Aging in place, accessibility upgrades, and the contractor's honest guide to doing it right the first time.
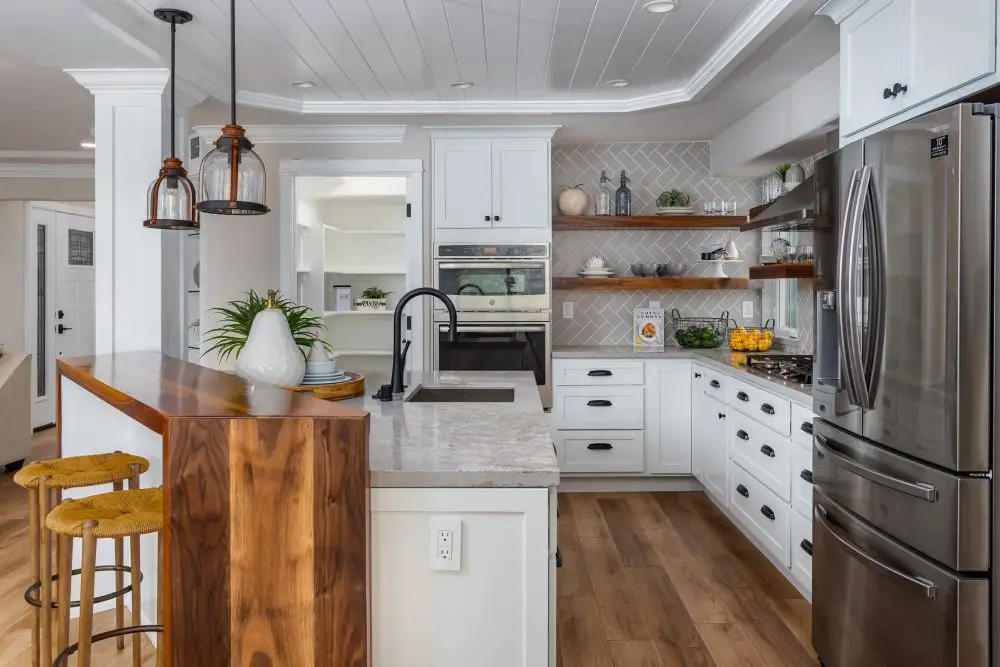
A bright Walnut Creek kitchen remodel featuring white shaker cabinets, a warm wood island accent, quartz countertops, and open shelving with a herringbone backsplash. Pendant lighting and stainless steel appliances complete the clean, modern layout.
Accessibility has always been personal to me — long before it became part of my work.
I was my grandpa's primary caregiver when he broke his shoulder at 88. Watching him navigate a house that was never designed with him in mind — doorways too narrow, a tub he couldn't safely get in and out of, a kitchen where everything he needed was either too high or required two steady hands — I understood viscerally that a home can either support your independence or quietly take it away.
Then my dad Tim was diagnosed with cancer, and his mobility changed in ways none of us were prepared for. We had built our lives around a house that suddenly needed to work differently. And now I'm learning what it means to design for my son, who is autistic — thinking about sensory environments, predictability, safety, and the specific ways a space can either calm or overwhelm a person depending on how it's built.
These aren't hypothetical design challenges for me. They're the reason I care about this work the way I do.
What I've learned across all three of these experiences is this: accessibility remodeling done well is invisible. It doesn't announce itself. It doesn't look clinical or institutional. It looks like a home that works — beautifully, quietly, for everyone who lives there and everyone who visits. That's the standard we build to at Toupin Construction, and it's the standard this guide is written around.
"Accessibility done right doesn't look like a hospital wing. It looks like a home that was designed to actually work for the people who live in it."
Universal Design vs. Aging in Place: Know the Difference
These terms get used interchangeably, but they mean different things — and the distinction matters for how you plan and budget a project.
Key Concept: Universal Design
Universal Design is the philosophy of designing spaces that work for everyone regardless of age, ability, or mobility — not as an accommodation, but as the baseline. A curbless shower is universal design. Lever door handles are universal design. A wide hallway is universal design. The goal is a home that no one ever has to adapt to because it was built to adapt to them. Universal design features often look like standard high-end design — which is exactly the point.
Key Concept: Aging in Place
Aging in place is the specific goal of modifying an existing home so a person can remain there safely and independently as they age, rather than moving to assisted living or a care facility. It's more targeted than universal design — focused on anticipated needs, current limitations, and the specific ways a home will need to support someone over the next 10–30 years. For most East Bay homeowners we work with, this means bathrooms, kitchen, entry, and circulation paths.
In practical terms: if you're doing a full bathroom remodel and want to build it right for the next 30 years, you're thinking about universal design. If your parent just moved in and needs the bathroom to be safely navigable now, you're thinking about aging in place. The upgrades overlap heavily — but the urgency and sequencing differ.
The Bathroom: Highest Priority, Highest Impact
More falls happen in bathrooms than anywhere else in the home. More independence is lost — and regained — based on bathroom design than any other room. This is always where we start.
Bathroom · Priority 01
Curbless Walk-In Shower
A curbless shower — also called a zero-threshold or barrier-free shower — eliminates the step-over that is the single greatest fall risk in a standard bathtub or shower pan configuration. The floor slopes continuously toward a linear drain, water stays contained, and entry and exit require no step at all.
This is the highest-impact single upgrade in an accessibility remodel. It serves a person with a walker or wheelchair immediately. It serves everyone else by being easier to clean, visually cleaner, and — frankly — more beautiful than a standard shower pan. It's one of the few cases where the accessibility upgrade is also the design upgrade.
Installation requires a sloped subfloor and a linear drain positioned correctly — both of which are rough-in decisions that happen before tile. The shower surround tile should have a slip-resistant surface rating; polished large-format tile looks beautiful and is a fall waiting to happen when wet.
Minimum Width
36"×36" code minimum; 60"×36" recommended for wheelchair use
Drain Type
Linear drain at one wall; floor slopes 1/4" per foot toward drain
Tile Surface
DCOF (Dynamic Coefficient of Friction) rating ≥ 0.42 wet for shower floors
Seat Option
Built-in tiled bench or fold-down teak/tiled seat mounted to blocking in wall
Bathroom · Priority 02
Grab Bars — Blocking First, Bars When Ready
Grab bars are the most under-installed safety feature in East Bay homes. Most homeowners resist them because they associate them with institutional aesthetics. That association is outdated — Moen, Kohler, and Signature Hardware all make grab bars in matte black, brushed gold, brushed nickel, and polished chrome that look like intentional design details, not medical equipment.
The more important point: grab bars must be anchored to blocking in the wall, not just drywall. A grab bar anchored only to drywall will pull out under load — exactly when you need it most. Blocking is 2×6 or plywood installed between studs during rough-in. It costs almost nothing during a remodel. It costs wall demolition after.
If you're not ready for bars today, install the blocking now and add bars later. That conversation costs nothing and takes ten minutes. Skipping it costs opening the wall.
At Toilet
Horizontal bar on side wall, 33–36" from floor; angled bar in front if space allows
In Shower
Vertical entry bar at shower opening; horizontal bar on back wall at 33–36"
Load Rating
Grab bars must support 250 lbs minimum per ADA guidelines
Style Tip
Combination grab bar/towel bar units — functional and invisible as accessibility hardware
Bathroom · Priority 03
Comfort-Height Toilet
Standard toilet seat height is 15 inches from the floor. Comfort-height (or ADA-height) toilets sit at 17–19 inches — closer to the height of a standard chair. The difference sounds small. For someone with knee replacement, hip issues, or reduced lower-body strength, it is genuinely significant in daily quality of life.
This is among the least expensive and least disruptive accessibility upgrades available. A comfort-height toilet is a standard toilet swap — same rough-in, same connections, costs roughly what any quality toilet costs. There is almost no reason not to install one during any bathroom remodel regardless of the client's age or current mobility.
Seat Height
Standard: 15"; Comfort-height: 17–19"
Clearance
18" minimum from toilet centerline to side wall; 60" clearance in front preferred
Bathroom · Priority 04
Accessible Sink and Vanity Height
Standard vanity height is 32 inches. For wheelchair users, ADA requires knee clearance under the sink — the sink mounted at 34 inches maximum with open space beneath, insulated pipes, and no base cabinet blocking access. Wall-mounted sinks and floating vanities accomplish this while looking completely intentional in a modern bathroom.
For standing users with back issues or reduced reach, the opposite is often true — a taller comfort-height vanity at 36 inches reduces the forward bend required. Adjustable-height vanity systems exist for households with mixed needs, though they're a larger investment.
ADA Sink Height
Rim max 34"; knee clearance min 27" high × 30" wide × 19" deep
Pipe Insulation
Required on exposed pipes under accessible sink to prevent contact burns
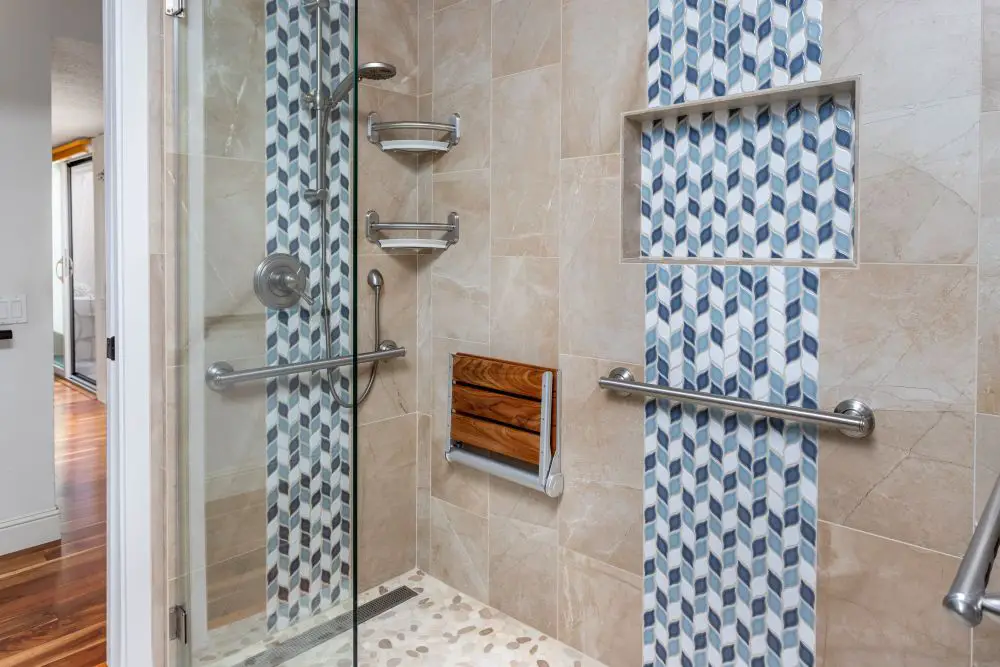
A walk-in shower with a decorative blue tile inlay, built-in niche, and multiple grab bars for accessibility. The design combines safety features with stylish finishes for a functional and modern bathroom remodel.
The Kitchen: Function Without Compromise
An accessible kitchen doesn't mean lowering everything to wheelchair height and calling it done. It means designing a kitchen that can be used comfortably by anyone — whether they're standing, seated, using a walker, or have reduced grip strength. Most of these upgrades are also just better kitchen design for everyone.
Kitchen · Countertops
Counter Heights and Knee Clearance
Standard countertop height is 36 inches. For wheelchair users, a prep area at 34 inches with knee clearance below it — no base cabinet, open space, insulated pipes — allows seated cooking and prep. This doesn't mean lowering the whole kitchen. It means designating one prep zone, typically near the sink or a peninsula, at accessible height.
Pull-out work surfaces and cutting boards that slide out from under the counter add flexible prep height without permanent changes to the counter plane.
Seated Prep Height
28–34" depending on wheelchair or seated height
Knee Clearance
Min 27" high × 30" wide × 19" deep for wheelchair approach
Kitchen · Storage & Hardware
Pull-Out Storage, Drawers, and Lever Handles
Deep base cabinet shelves are nearly inaccessible for anyone with limited reach, limited mobility, or who needs to avoid bending. Full-extension pull-out drawers and roll-out shelves in base cabinets bring everything forward into reach without requiring the user to crouch, bend, or reach into darkness.
Knob hardware requires a pinching grip. Lever handles and D-pull handles can be operated with a closed fist — critical for anyone with arthritis, reduced grip strength, or hand tremors. This is a $5 hardware swap per cabinet that makes a measurable daily difference.
Reach Range
Accessible storage ideally between 15"–48" from floor
Hardware
Lever handles or D-pulls; no knobs requiring pinch grip
Kitchen · Appliances
Accessible Appliance Placement
Side-opening ovens eliminate the need to reach over a hot open door. Drawer-style dishwashers and microwaves at counter height reduce bending. Cooktops with front or side controls rather than rear controls keep hands from reaching over active burners — a safety improvement that benefits everyone, not just those with mobility limitations.
Refrigerator placement matters too — French door and side-by-side configurations keep the most-used items within standard reach range without requiring bending to the bottom of a single-door unit.
Oven Access
Side-opening or wall oven at counter height preferred
Cooktop Controls
Front or side controls — never rear-mounted over active burners
Circulation, Entries, and Doorways
A beautifully accessible bathroom and kitchen mean nothing if the paths to get there are impassable. Circulation — how people move through the home — is the foundation everything else sits on.
Circulation and Entry Specifications
- Doorways: 32" minimum clear width (the door opening with the door open at 90°, not the rough opening). 36" is preferred for comfortable wheelchair navigation. Standard interior doors are typically 28–30" — often the first thing that needs widening.
- Hallways: 36" minimum clear width for ambulatory users with walkers; 48" preferred for wheelchair users making turns. Measure at the narrowest point including any trim, baseboards, or furniture in the path.
- Zero-step entry at the main entrance — either original construction or a ramp with a 1:12 slope ratio (1 inch of rise per 12 inches of run). A 6-inch step requires a 6-foot ramp run minimum. Ramps can be integrated beautifully into landscaping and hardscape rather than looking bolted-on.
- Pocket doors or barn doors where widening a doorway isn't feasible — they eliminate the door swing clearance requirement and can make a previously inaccessible space usable without major structural work.
- Lever handles on all doors — the pinch-grip round knob is one of the most quietly hostile pieces of hardware in residential design. Lever handles cost the same, work better for everyone, and should be standard on every door in the house.
- Lighting at all circulation paths — motion-activated night lighting in hallways and the path to the bathroom prevents falls during nighttime navigation. This is one of the highest-return, lowest-cost interventions available.
- Flooring transitions and thresholds — any raised threshold between rooms is a tripping hazard. Flush or beveled transitions between flooring types are the accessible standard and look more finished regardless.
Trade Term: ADA Guidelines
The Americans with Disabilities Act (ADA) sets accessibility standards that are legally required for commercial buildings — restaurants, offices, public facilities. For private residences, ADA guidelines are not legally required, but they're the industry standard for what "accessible" means in practice, and they're what contractors reference when designing aging-in-place or accessible remodels. When we say a spec is "ADA compliant," we mean it meets the standards developed and tested for genuine accessibility — which is the right benchmark regardless of legal obligation.
???? Rossmoor Homeowners — Aging in Place in a Co-Op
Rossmoor is one of the largest age-restricted communities in Northern California — approximately 6,700 co-op and condo units, designed in the 1960s and 70s for active retirement living. The reality is that many of those original layouts — standard doorways, tub-shower combos, narrow galley kitchens — don't align with today's aging-in-place needs.
The complication: every structural modification in Rossmoor requires Mutual board approval before work begins, and some Mutuals have specific requirements around accessible modifications — particularly anything involving shared walls, subfloor work, or changes to plumbing stacks. Some Mutuals have become more accommodating of accessibility remodels as the demographics of their residents have shifted; others maintain strict review processes.
The good news: many high-impact accessible upgrades — comfort-height toilets, grab bar installation (with blocking already in place), lever hardware, curbless shower conversions — are within standard Mutual approval scope and often approved without unusual delay when documentation is prepared correctly. We've navigated this process across dozens of Rossmoor accessibility remodels and know what each Mutual typically requires. Call us before you plan anything: (925) 937-4200.
Flooring: The Surface Everyone Walks On
Flooring choices have direct consequences for fall risk, wheelchair maneuverability, and how fatiguing the home is to navigate. This is not a purely aesthetic decision.
| Flooring Type | Slip Resistance | Wheelchair Navigation | Accessibility Notes |
|---|---|---|---|
| Hardwood / Engineered Wood | ◐ Moderate (varies by finish) | ✔ Excellent — smooth, low resistance | Matte finish improves slip resistance; avoid high-gloss in wet-adjacent areas |
| Luxury Vinyl Plank (LVP) | ✔ Good | ✔ Excellent — smooth, slightly cushioned | Waterproof versions ideal for bathroom approaches; good impact absorption |
| Porcelain / Ceramic Tile | ◐ Depends on texture rating | ✔ Good — firm, smooth | DCOF rating ≥ 0.42 wet required in wet areas; large format reduces grout joint trip edges |
| Low-Pile Carpet (≤ 1/2") | ✔ Very good — grip underfoot | ◐ Moderate — adds rolling resistance | Reduces fall impact; no thick rugs or shag; secure edges at all thresholds |
| High-Pile / Area Rugs | ✗ Poor — bunching, edges | ✗ Poor — catches wheels and feet | Remove from circulation paths entirely; major tripping hazard |
From Personal Experience
When my grandpa was living with us, the area rugs were the first thing that had to go. Not negotiable. He wasn't in a wheelchair, but the rugs caught his walker and bunched under his feet more times than I want to remember.
We also widened the bathroom doorway and installed a grab bar at the toilet — and I watched him go from avoiding that bathroom to using it independently again within a week. The ROI on that grab bar, emotionally and practically, was immediate and permanent. That's the kind of remodeling outcome that doesn't show up in cost-per-square-foot calculations but is the whole point of doing this work.
The Planning Sequence That Saves Money
Accessibility remodeling done in the wrong order is expensive. Some features — blocking for grab bars, curbless shower rough-in, widened doorway framing — must happen before other work closes in around them. Add them after the fact and you're reopening finished walls, reflashing tile, or reframing doorways at full cost.
Sequence: What to Decide Before Anything Is Built
- Doorway widths first. If a doorway needs to widen from 28" to 36", that's framing and structural work that happens before drywall, flooring, or trim. Decide this in the planning phase, not after you've already gotten quotes on the rest.
- Blocking for grab bars before tile. Solid blocking between studs at the correct height — toilet side wall (33–36"), shower back wall and entry — goes in during rough-in framing. Zero cost at that stage. Costly if you tile first and add it later.
- Curbless shower decision before plumbing rough-in. The drain location and subfloor slope for a curbless shower must be set before the shower floor tile goes in. This is a plumbing decision, not a tile decision.
- Lever hardware on every door from the start. It costs the same as round-knob hardware and never needs to be retrofitted. Just install it. There's no reason not to.
- Comfort-height toilet on every toilet replacement. Same cost, same rough-in, better for everyone. Default to it unless there's a specific reason not to.
- Motion night lighting wiring during electrical rough-in. Low-voltage wiring in hallways and the bathroom path costs very little during rough-in. Retrofitting it means patching drywall and painting.
- Anti-scald valve during plumbing rough-in. A thermostatic mixing valve at the shower limits maximum water temperature — critical for anyone with reduced sensation, children, or seniors. This is a rough-in valve decision, not a trim decision.
Common Questions
Do accessible features make my home look institutional?
Not if they're designed in from the start with the right finishes. Grab bars in matte black or brushed gold, a curbless shower with large-format tile, lever hardware throughout — none of this reads as medical equipment in a well-designed space. The institutional look comes from retrofitted plastic grab bars and afterthought additions, not from accessibility as a design principle. When it's integrated from the beginning, it's just good design.
How much does an aging-in-place bathroom remodel cost compared to a standard remodel?
The incremental cost is often smaller than people expect. A curbless shower costs roughly the same as a standard tile shower if the rough-in is planned for it from the start — the drain is different, the subfloor slope is different, but the labor and material are comparable. Grab bar blocking is essentially free during a remodel. A comfort-height toilet costs the same as any toilet. The expensive mistakes happen when accessible features are added as retrofits after the room is finished — that's when walls get opened and tile gets disturbed.
What are the most important first changes for a parent moving in?
In order of impact and urgency: (1) one zero-threshold entry — either the front door or a side door that's close to where they'll park; (2) bathroom grab bars at the toilet and in the shower, anchored to blocking; (3) comfort-height toilet if it's not already; (4) remove all area rugs from circulation paths; (5) motion lighting in hallway and bathroom. These five things can often be accomplished quickly and at relatively modest cost while a more comprehensive remodel is planned.
Can I get financial assistance for accessibility modifications?
Potentially yes. California has several programs worth investigating: the California PACE program (Property Assessed Clean Energy, which in some jurisdictions covers accessibility), certain county-level home modification programs for seniors, and — for veterans — the VA's Specially Adapted Housing grants. Some modifications may also be deductible as medical expenses if prescribed by a physician. We're not tax or financial advisors, but we can point you toward the right questions to ask. Bring it up during your consultation.
Is it worth adding accessibility features if we're not sure we'll need them?
The blocking-now argument is compelling: grab bar blocking installed during a remodel costs essentially nothing extra. It doesn't change how the bathroom looks. It doesn't affect resale. But it means that in five, ten, or twenty years — whenever the moment comes — you can add bars without opening a single wall. The question isn't whether you'll eventually benefit from accessible design. The question is whether you want to pay for it twice.
Keep Reading
Planning for the long haul? Let's design it right the first time.
Whether you're planning ahead, responding to a change in someone's needs, or remodeling a Rossmoor home that needs to work better — we've done this work across Walnut Creek, Rossmoor, Alamo, Danville, and Lafayette for over 40 years. We'll help you figure out what to build in now and what can wait.
Schedule a Consultation See Our ADA & Accessibility Work
Toupin Construction
Ready to start your remodel?
Whether you're dreaming of a new kitchen, a spa-worthy bathroom, or a whole-home transformation — we’d love to hear about your project. Reach out and let's talk.
‹ Back
Comments