


By using our website, you agree to the use of cookies as described in our Cookie Policy
Blog
Big Style. Smart Spending.
Remodeling shows make it look like you need $50K, a film crew, and a commercial break to pull off a transformation. Real life is a lot more practical than that — and honestly, more interesting. A tight budget forces creativity. And creativity is where good design actually lives.
Here's what 40+ years of remodeling East Bay homes has taught us about stretching a dollar without sacrificing the result.
1
Paint: Highest ROI, Full Stop
If you do nothing else on this list, paint. A fresh coat transforms a room in a weekend for a few hundred dollars. It covers sins, changes the perceived size and light of a space, and sets the entire mood. Nothing else in your toolkit touches that return.
Quick Lesson
LRV — Light Reflectance Value
Every paint color has an LRV score from 0 (pure black) to 100 (pure white). Higher LRV = more light bounced around the room. In smaller Walnut Creek and Rossmoor condos where natural light is limited, choosing a color with LRV above 65 can genuinely make a room feel bigger. Ask your paint supplier — they'll have the number right on the chip.
Tim's Take
Light colors open up a space. Deep, moody tones add drama — but commit to them fully. Half-hearted "greige" is the worst of both worlds. Pick a direction and go there. If you're stuck between 12 swatches, that's paint paralysis — and we've got a whole post on how to break through it.
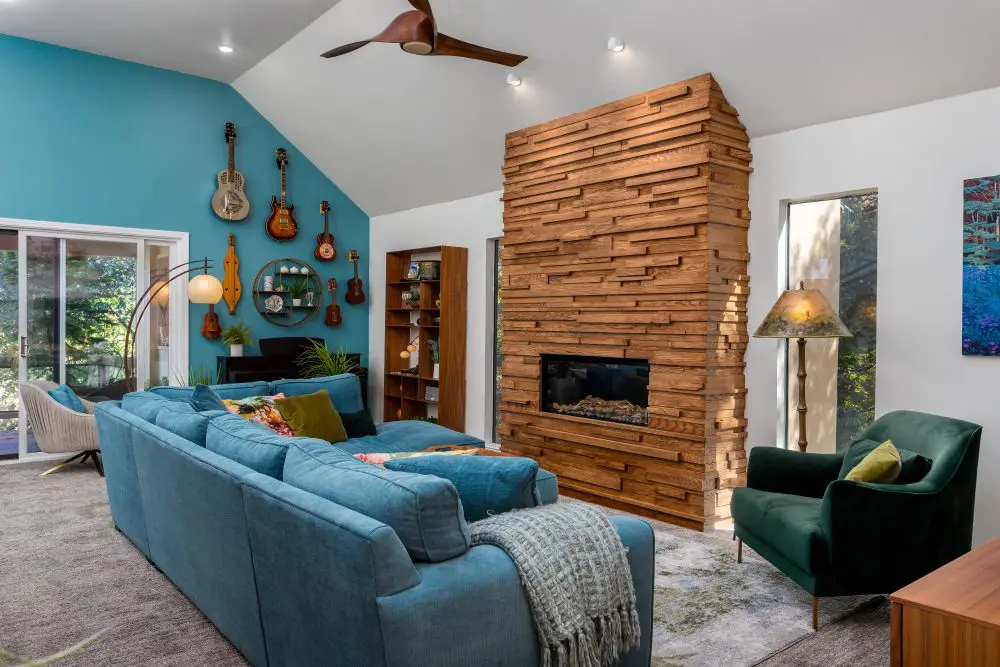
Bold Walnut Creek living room featuring a teal accent wall paired with a textured wood fireplace surround, creating a warm, modern focal point with layered materials and color contrast.
2
Fixtures & Hardware: The Jewelry of the Room
Cabinet pulls. Faucets. Light fixtures. These are small in size and enormous in impact. Swapping outdated hardware is one of the few remodeling moves you can do yourself in an afternoon — no contractor required — and the visual difference is jarring in the best way.
A kitchen with original 1990s brass pulls and a new brushed nickel faucet reads modern. The same kitchen with consistent matte black hardware throughout reads intentional and designed. That's a $200–$500 difference in parts, not a $15,000 renovation.
Pro Move
Pick one metal finish and stick to it across every fixture in the room. Mixing metals is a trend — mixing metals inconsistently is just a mess. Decide: brushed nickel, matte black, unlacquered brass, or polished chrome. Then go all-in.
3
Refinish Instead of Replace
This is the one that saves our clients the most money. If your cabinet boxes (the structural carcasses behind the doors) are solid, you don't need new cabinets. You need new faces.
Know the Difference
Refacing vs. Repainting vs. Replacing
Repainting: Least expensive. Sand, prime, and repaint the existing doors in a new color. Works when the doors are in good shape.
Refacing: Keep the boxes, replace the doors and drawer fronts entirely. New look, fraction of the cost of full replacement. This is our most-requested budget upgrade.
Replacing: Pull everything out and start over. Necessary when layout needs to change or boxes are damaged. Significantly more expensive.
We do cabinet refacing projects constantly across Walnut Creek, Alamo, and Rossmoor — it's genuinely one of the smartest investments you can make in an older kitchen or bathroom. We wrote a whole guide on how to decide which route makes sense for your situation.
| Option | Relative Cost | Timeline | Best When... |
|---|---|---|---|
| Repaint doors | $ | 2–4 days | Doors are structurally sound |
| Reface (new doors, same boxes) | $$ | 1–2 weeks | Boxes are solid, layout works |
| Full replacement | $$$$ | 3–6 weeks | Layout needs rework, boxes are damaged |
4
Do One Room Right Instead of Three Rooms Halfway
I watch homeowners spread a modest budget across the whole house and end up with nothing that really lands. A $15,000 budget spread across a kitchen, a bathroom, and the living room is $5,000 per space — which doesn't go very far anywhere. That same $15,000 focused entirely on your kitchen? That's a genuinely impressive result.
"Start with the space you live in most. Make it exactly right. Then move outward."
For most East Bay families, that's the kitchen. For Rossmoor residents, it's often the primary bathroom — where daily routines happen and where an accessible, functional layout pays dividends for years. Pick your highest-impact room and pour your energy there first.

Simple bathroom refresh in Walnut Creek with marble-look tile, a decorative accent strip, and updated wall sconce lighting for an easy, cost-effective upgrade.
5
Splurge on One Thing. Save on Everything Else.
Every designer knows this move. Choose one focal point in the room — a tile backsplash, a statement light fixture, a custom range hood — and let everything else be simple and affordable. Your eye goes to the hero piece. The surrounding materials read as intentional instead of cheap.
We've done kitchens where a $1,200 handmade tile backsplash against simple white shaker cabinets looked more beautiful than a full-budget renovation with no clear focal point. The contrast does the work.
Where to Splurge vs. Save
Worth the spend: Backsplash tile, faucet, light fixture over the island, cabinet hardware on upper cabinets.
Save here: Interior cabinet shelves, lower-traffic flooring, pantry organization inserts, paint (good paint isn't cheap, but it's cheaper than everything else).
6
Storage Is a Design Problem, Not Just a Practical One
Clutter makes any room feel smaller, cheaper, and more chaotic — even a freshly painted one. Smart storage built into your remodel is worth more than a decorative upgrade of equivalent cost, because it changes how the space feels every single day.
Budget-conscious storage wins: floating shelves (open, airy, visually expand the room), pull-out organizers inside existing cabinets, a properly designed pantry corner with adjustable shelving, or a simple drawer insert for utensils. None of these are expensive. All of them change how you interact with the space.
7
Know What You Can DIY — And What You Really Can't
DIY is genuinely great for the right projects. Painting, shelf installation, hardware swaps, décor changes — these are weekend-warrior territory and you'll save real money doing them yourself. The problems start when homeowners try to DIY the things that need licensed professionals.
Safe to DIY
- Painting walls and trim
- Installing floating shelves
- Swapping cabinet hardware
- Peel-and-stick backsplash tile
- Decorative light fixture swap (no new wiring)
Hire a Pro
- Any electrical work (circuits, panels)
- Plumbing (supply lines, drain relocation)
- Structural walls and framing
- Tile over wet areas (shower, tub surround)
- Anything requiring a permit
In California, doing permitted work without a license isn't just a safety issue — it can complicate your home sale later. A buyer's inspector will find unpermitted electrical or plumbing, and it creates real problems. The cost of a licensed contractor on the work that requires one is almost always worth it.
Let's Make Your Budget Work Harder
We've helped hundreds of East Bay homeowners get more than they expected out of a remodel. No pressure, no pitch — just an honest conversation about what's possible.
Get a Free Consultation See Our WorkOr call us directly: 925-937-4200 · CA Lic #626819‹ Back
Comments