


By using our website, you agree to the use of cookies as described in our Cookie Policy
Blog
Aging in Place: How to Design a Bathroom That Works for the Long Haul

Remodeling Tips · Aging in Place · Rossmoor
Aging in Place: How to Design a Bathroom That Works for the Long Haul
By Candi Toupin · Toupin Construction · Walnut Creek, CA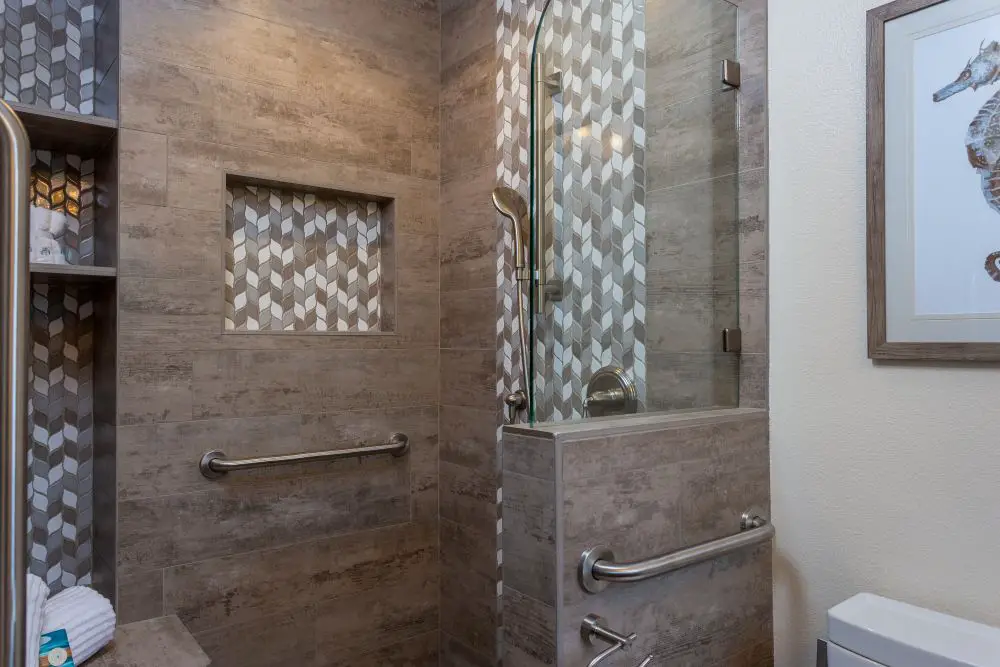
An accessible shower design featuring grab bars, a partial glass enclosure, and easy entry, offering both safety and a clean, modern look for long-term usability.
The call we get most often about aging-in-place bathrooms isn't from someone who's already struggling. It's from someone whose parent just had a fall, or whose spouse got a diagnosis, or who's 68 and thinking clearly about what 78 might look like. The fear isn't in the bathroom yet — but they can see it coming, and they want to get ahead of it.
That's exactly the right instinct, and exactly the right time to call. Because the most expensive version of an aging-in-place bathroom remodel is the one done in a hurry after something has already happened — when you're working around a recovery timeline instead of a lifestyle preference, and every decision is driven by urgency rather than thoughtfulness.
We've remodeled hundreds of bathrooms in Rossmoor, Walnut Creek, and the broader East Bay with aging in place as the central goal. Here's what we've learned about what matters most, what most contractors get wrong, and how to build a bathroom that's genuinely easier and safer to live in — without it looking like a hospital.
What "Aging in Place" Actually Means in a Bathroom
Aging in place means staying in your home as your physical needs change — rather than moving to assisted living or a facility because your home can no longer safely support you. The bathroom is the highest-stakes room in that equation. It's where falls happen, where mobility limitations become most visible, and where poorly designed space can turn a routine morning into a genuine risk.
The challenges we design around aren't just wheelchair access (though we do that too). More often they're subtler: grip strength that's declined enough that a round faucet handle is hard to turn. Balance that's changed enough that stepping over a 4-inch tub curb is a real decision every morning. Vision that's shifted enough that poor lighting at the vanity creates shadows in the wrong places. These are gradual changes, and the bathroom needs to accommodate them before they become acute.
Trade Term: Universal Design
Universal design is the principle that spaces should work for people across a range of ages, abilities, and body types — not just for a specific user at a specific moment. A curbless shower isn't just safer for someone with reduced mobility. It's easier to clean, it makes a small bathroom feel larger, and it photographs beautifully. A lever door handle isn't just accessible — it's easier when your hands are full. Good aging-in-place design doesn't look clinical because it doesn't have to. It just looks like a bathroom that works well for everyone.
The Six Decisions That Shape an Aging-in-Place Bathroom
Not every item on an accessibility checklist deserves equal weight. These six are the ones that structurally determine how safe and functional the space is. Get these right and you have a bathroom that works for decades. Get them wrong and no amount of decorative grab bars fixes it.
"The best aging-in-place bathroom doesn't look like an accessibility project. It looks like a bathroom where someone thought carefully about how people actually move through space — and then built for that, beautifully."
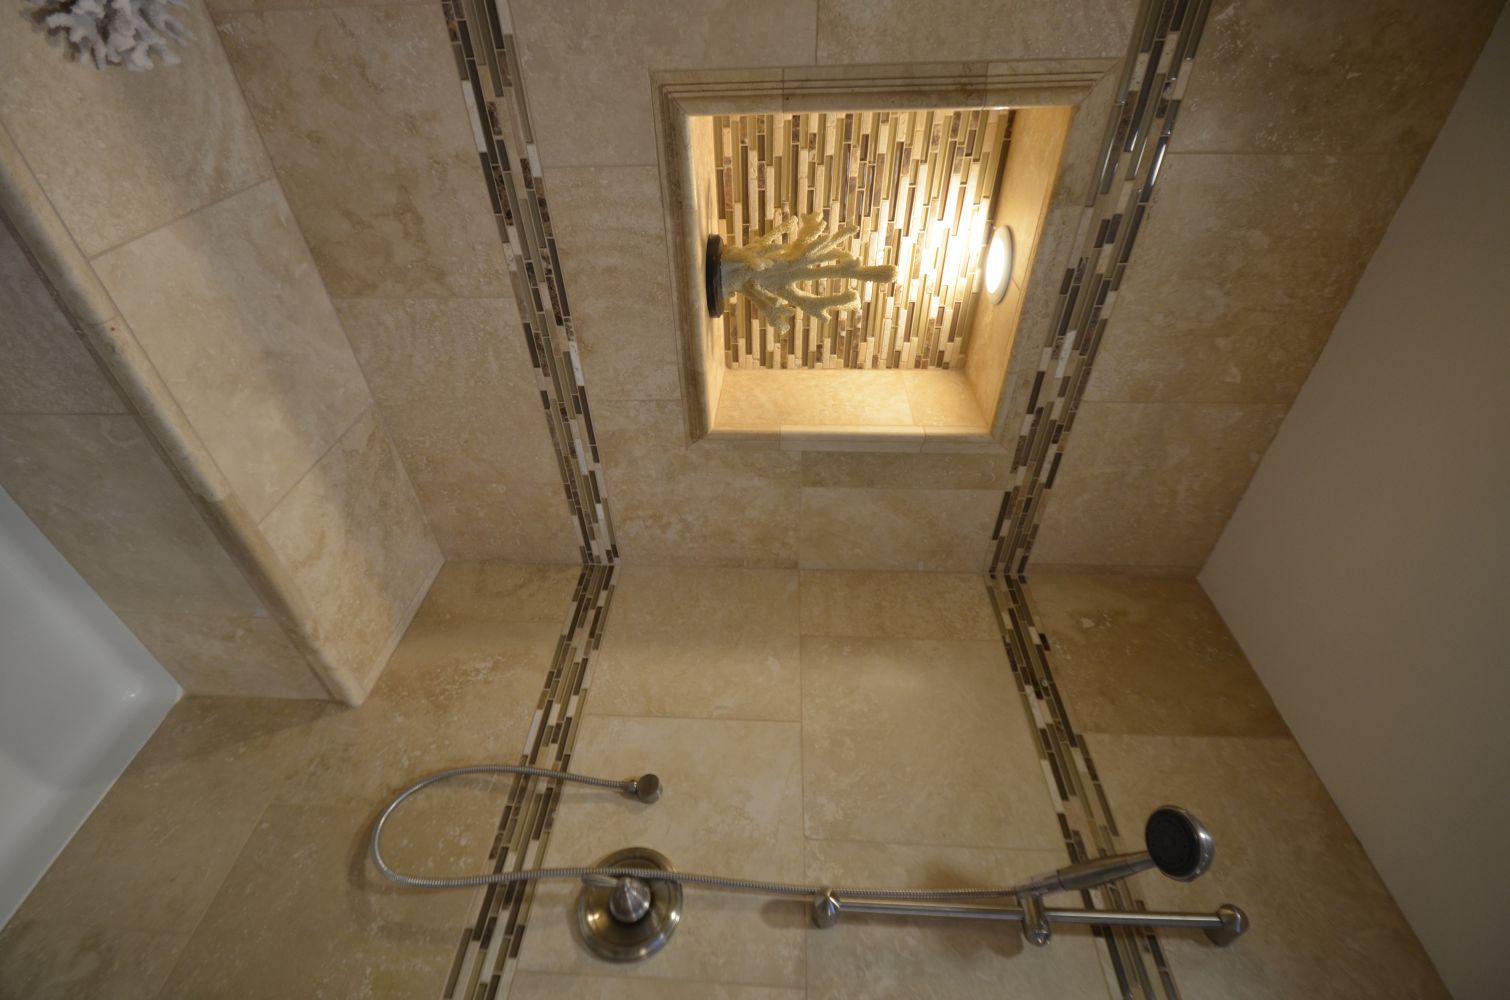
A walk-in shower with a built-in bench and recessed niche, combining comfort and accessibility with thoughtful lighting for improved visibility and ease of use.
A Quick Safety Audit for Your Current Bathroom
Before planning any updates, walk through your bathroom and flag these. Any "no" is worth addressing — some immediately, some as part of a larger project.
-
Entry width — Is the doorway at least 32 inches? Does the door swing into the bathroom (creates clearance problem)?
-
Floor surface — Is the floor tile textured or smooth? Do you use a bath mat that slides?
-
Shower entry — Is there a curb or threshold to step over? How high?
-
Grab bar readiness — Are there bars at the toilet and in the shower? If not, is there blocking in the walls to support them?
-
Toilet height — Is it standard (15") or comfort height (17–19")? Can you sit and stand without strain?
-
Faucet and valve type — Round knobs or lever handles? Thermostatic control or single-handle?
-
Lighting — Is there shadow at the vanity? Is there a night light for 2am trips?
-
Ventilation — Does the fan run quietly enough that people actually use it? Moisture buildup makes floors slippery.
Aging in Place in Rossmoor: What's Different
Rossmoor is a 55+ active adult community in Walnut Creek — which means aging-in-place bathroom design isn't a niche conversation there, it's the core of almost every project we do. And Rossmoor has specific considerations that don't apply to single-family home remodels.
The units were built between the mid-1960s and early 1980s, which means compact bathroom footprints, fixed drain locations, and plumbing that's been in place for decades. Moving a toilet or shower drain in a Rossmoor unit requires Mutual board approval plus a City of Walnut Creek permit — and the drain stack location is often fixed by the building structure, limiting where fixtures can go. We assess this upfront on every Rossmoor bathroom project so there are no surprises mid-demo.
The Mutual approval process also affects timeline. Any permitted plumbing or electrical work requires board sign-off before it begins — most boards meet monthly, which means a 4–8 week approval window before work starts. If you're planning a bathroom remodel with aging-in-place features in Rossmoor, that conversation needs to start well before you think you need it.
What Most Contractors Get Wrong
These are the mistakes we're called in to fix — or to avoid — on accessibility bathroom projects. They're all preventable with proper planning.
No Blocking for Grab BarsWalls tiled over without blocking mean bars can't be added later without major demolition. Blocking costs almost nothing while walls are open.
Wrong Shower SlopeA curbless shower that doesn't drain correctly sends water onto the bathroom floor. Slope and drain placement must be engineered before tile goes down.
Controls Out of ReachShower controls placed at the back wall mean reaching into cold water to start the shower. Controls should be reachable from outside the spray zone and from a seated position.
Glossy Tile on the FloorPolished and high-gloss tile is beautiful and dangerous when wet. Textured tile with a slip coefficient of ≥0.60 (wet) is the standard for wet area floors. We check this on every spec.
Undersized Exhaust FanA fan that doesn't clear moisture fast enough leaves the floor damp between uses. Size CFM to room volume; add a humidity sensor so it runs automatically. Damp floors are slip hazards.
Inadequate WaterproofingIn a curbless shower especially, the waterproofing membrane needs to extend well beyond the shower footprint — not just the pan. A failure here shows up as water damage months or years later, not immediately.
Candi's Take
The hardest part of these conversations isn't the design — it's the timing. People come to us when they're ready, and "ready" means different things. Sometimes it's proactive: someone in their 60s who wants to invest in staying in their home for the next thirty years. Sometimes it's reactive: a fall happened, a diagnosis came, and the bathroom needs to change now.
We're glad to help in either case, but the proactive version is so much better. The decisions are thoughtful. The design can be beautiful. There's no urgency forcing shortcuts. And the person living in the bathroom gets to participate in making it something they love, rather than something they accepted in a hurry. If you're reading this and thinking "not yet" — I'd gently push back on that. The best time to plan an aging-in-place bathroom is before you need one.
— Candi Toupin, Toupin Construction
Questions We Hear From Homeowners Planning Ahead
Does an aging-in-place bathroom have to look clinical or institutional?
No — and this is the misconception we work hardest to push back on. Curbless showers are a design trend regardless of accessibility considerations. Comfort-height toilets are standard in most new construction. Lever faucets are contemporary and common. Grab bars now come in every finish imaginable — matte black, brushed brass, polished chrome — and can be designed to look like intentional hardware elements rather than medical equipment. A well-designed aging-in-place bathroom looks like a thoughtful, well-done bathroom. Full stop.
What's the most important thing to do if I can only do one thing right now?
Install grab bar blocking in the shower and next to the toilet. If the walls are already tiled and you're not ready for a full remodel, this means opening the walls specifically to add blocking and then retiling — or using surface-mounted blocking systems designed for retrofit installation. It's less elegant, but it's far better than bars anchored into drywall. The blocking is what makes everything else possible later without demolition. If you're doing any bathroom work at all right now, add blocking everywhere that a bar might ever go. You will not regret it.
How much does an aging-in-place bathroom remodel cost compared to a standard remodel?
In most cases, 10–20% more than a comparable standard remodel — not dramatically more. The additional cost comes from: blocking installation behind tile, the linear drain and proper slope engineering in a curbless shower, and occasionally from layout changes to achieve clearance requirements. The fixtures themselves (comfort-height toilets, lever faucets, grab bars) often cost the same or less than comparable standard fixtures. If you're doing a full bathroom remodel anyway, adding aging-in-place features at the same time is by far the most cost-effective approach. Adding them later almost always requires opening walls again.
Can my existing bathroom be converted to aging-in-place without a full gut?
Sometimes, but it depends on what's there. A shower-to-curbless conversion requires accessing the subfloor for drain work — that usually means removing the existing shower floor at minimum. Adding grab bars requires either accessible framing (unlikely in a finished bathroom) or surface-mounted blocking solutions. Replacing a standard toilet with a comfort-height version is simple and requires no demolition. Changing out faucets and hardware is straightforward. Our advice: assess what you actually need and get a real evaluation before assuming it needs to be all-or-nothing. Sometimes targeted work is exactly right; sometimes the underlying structure requires more.
At what age should I start thinking about aging-in-place features?
Whenever you're doing a bathroom remodel, regardless of age. If you're 45 and remodeling your primary bathroom, adding blocking, a curbless shower option, and a comfort-height toilet costs very little extra and means you won't have to redo that work in twenty years. Universal design serves everyone — not just older adults. And practically speaking, if you plan to stay in your home into your 70s and 80s, the design decisions you make in your 40s and 50s are the ones you'll be living with then. Make them with the full timeline in mind.
Planning ahead for aging in place? Let's walk through it together.
We've designed and built hundreds of aging-in-place bathrooms in Rossmoor, Walnut Creek, and the East Bay. We know what matters, what lasts, and what the Mutual approval process requires. Start with a conversation.
Schedule a Free Consultation See Our WorkCall us: 925-937-4200 · CA Lic #626819
Toupin Construction
Ready to start your remodel?
Whether you're dreaming of a new kitchen, a spa-worthy bathroom, or a whole-home transformation — we’d love to hear about your project. Reach out and let's talk.
‹ Back
Comments