


By using our website, you agree to the use of cookies as described in our Cookie Policy
Blog
How to Choose a Backsplash That Works in Real Life

How to Choose a Backsplash That Works in Real Life
A bright kitchen with white cabinetry and a full-height granite backsplash that matches the countertops. The continuous stone surface creates a seamless, low-maintenance look while showcasing natural movement and warm undertones.
We were demoing a kitchen in Lafayette a couple of years ago and pulled off the old backsplash to find four different layers underneath — peel-and-stick vinyl on top of painted drywall on top of old ceramic on top of what appeared to be 1970s wallpaper with small roosters on it. Four decisions, made across four decades, each one trying to fix the previous one without addressing the actual problem.
The actual problem, in almost every case, is the same: the homeowner picked a backsplash for how it looked in a photo instead of how it was going to live in their specific kitchen. A material that photographs beautifully can be a maintenance disaster. A pattern that looks bold on Pinterest can be claustrophobic in a galley kitchen. And a "budget-friendly" peel-and-stick solution can cost more in the long run than the tile it replaced.
This guide is built around the decision sequence that actually works — maintenance first, material second, pattern third, installation fourth. By the end, you'll know what questions to ask and what to watch out for before you commit to anything.
Start Here: Maintenance Determines the Material
Before you open a single tile catalog, answer one question honestly: how do you actually cook? Not how you cook in your head — how you cook on a Tuesday night when you're tired and dinner is getting made fast.
If you cook at high heat, use a lot of oil, and make big weekend meals, you need a backsplash that can be wiped down in thirty seconds without a cleaning ritual. If you primarily use your kitchen for coffee and takeout reheating, you have more material latitude. The tile doesn't know the difference, but you'll know it every single day.
Know the Lingo
Lippage — and Why It Matters for Backsplash
Lippage is the height difference between the edges of adjacent tiles — when one tile sits slightly higher than the one next to it. On a floor, a little lippage is tolerable. On a backsplash at eye level, it's immediately visible. Materials like handmade zellige tile and recycled glass are intentionally irregular and have natural lippage built into their character. Porcelain and ceramic are manufactured to be flat and consistent. Neither is wrong — but your installer needs to know which you're working with, because the technique is different. Consistent spacers, the right thinset, and careful sheet pressure on glass are all part of managing lippage before it becomes something you notice every morning.
The East Bay adds one more variable worth mentioning upfront: our water. Walnut Creek and most of the surrounding area has moderately hard water — meaning it has mineral content that leaves deposits on surfaces, especially around faucets and along grout lines near the sink. This is not a dealbreaker for any material, but it does mean light-colored grout near the sink requires more frequent attention than most people expect when they're choosing it in a showroom.
The Materials: Honest Tradeoffs for Every Option
Here's the straightforward version of what each material actually delivers — not the marketing version.
Ceramic and Porcelain: The Workhorses
Standard CeramicEasy Care
The most forgiving and budget-friendly option. Comes in an enormous range of shapes, finishes, and sizes. Chips at corners over time but is easy to replace because it's widely available. Warm bulbs prevent whites from reading cold — worth knowing before you tile under fluorescent kitchen lights.
Care: Dish soap and microfiber. Doesn't require sealing.
PorcelainEasy Care
Denser and harder than ceramic, with lower water absorption. Large-format porcelain panels mean fewer grout lines — less to clean, cleaner visual line. Porcelain in marble or concrete looks has gotten remarkably convincing. The tradeoff: heavier and harder to cut cleanly, so installation requires more skill.
Care: Mild degreaser; rinse thoroughly to prevent haze buildup.
ZelligeModerate Care
Handmade Moroccan clay tile with intentional irregularity — slightly varied faces, natural pitting, and beautiful luminosity under light. Each tile is genuinely different. That variation is the point. Sample carefully: pitting depth and color variation differ significantly by manufacturer and batch.
Care: pH-neutral cleaner; tighter grout joints reduce grime accumulation in the pitting.
Encaustic / PatternedModerate Care
Cement-body encaustic tiles are beautiful and porous — they require sealing and careful maintenance. Porcelain versions that mimic the look give you the pattern without the maintenance commitment. We almost always recommend porcelain look-alikes for kitchen backsplashes unless the homeowner is genuinely committed to the care routine.
Care (cement): Seal at install; reseal annually; pH-neutral cleaner only — acids etch the surface.
Glass: Beautiful Under Light, Demanding to Install
Glass Subway / Field TileEasy Care
Glass reflects light in a way ceramic can't — it adds depth and sparkle without adding visual weight. Translucent glass requires white thinset behind it; any colored adhesive will show through the tile. Fast to clean. Prone to water spots near the sink — a quick towel dry after steamy cooking sessions keeps it looking sharp.
Care: Dish soap and water; dry near faucets to prevent water spotting.
Glass Mosaic / IridescentModerate Care
Glass mosaics on mesh sheets work beautifully on wavy walls because the small format can flex slightly. Iridescent glass shifts color with movement — beautiful as a feature panel, overwhelming as a full wall. Keep the surrounding field calm if you're using iridescent tile anywhere. The shimmer does the work; it doesn't need help.
Care: Soft brush; seal grout. Grout haze on glass is harder to remove than on ceramic — clean promptly.
Toupin TipGlass tile is unforgiving of bad installation. Lippage that would be barely noticeable on ceramic reads clearly on glass because the reflective surface amplifies any height variation between tiles. If you're going glass, the installer's technique matters more than it does with almost any other material. Ask to see examples of their glass tile work specifically — not just their tile work in general.
Natural Stone: Depth and Character — With a Real Care Commitment
Marble (Carrara, Calacatta)Demanding Care
Marble is calcite-based, which means acids etch it — lemon juice, wine, tomato sauce, most cleaning products. Honed marble hides etching better than polished because the surface is already matte. Calacatta has bolder, warmer veining; Carrara is cooler and more subtle. Beautiful in the right kitchen. Wrong for anyone who cooks aggressively and doesn't want to think about the backsplash.
Care: pH-neutral stone cleaner only. Seal every 6–12 months. Wipe spills immediately.
QuartziteModerate Care
Often confused with quartz countertop material (they're completely different). Quartzite is a natural stone with marble-like veining but significantly more hardness and acid resistance. It's a legitimate upgrade from marble for kitchens where you want the look without the fragility. Buy from reputable sources — "quartzite" is one of the most commonly mislabeled stones in tile showrooms.
Care: Seal at install; reseal periodically. More forgiving than marble but still a natural stone.
TravertineDemanding Care
Warm, rustic, beautiful — and full of natural voids and pits that need to be filled and sealed before installation, especially behind cooktops where grease and steam accumulate. We've installed travertine in dozens of Walnut Creek kitchens and it looks stunning when maintained. The clients who struggle with it are the ones who skipped the sealing step at install.
Care: Fill and seal all pits at install. Reseal annually. Avoid acidic cleaners.
Soapstone / SlateModerate Care
Soapstone is heat-resistant, non-porous, and has a beautiful matte depth. Scratches blend in with light sanding and oiling. Slate has an earthy, textural quality — gauged (calibrated) slate has a flatter face than natural cleft slate and is easier to install and maintain. Both are excellent choices for kitchens where the design leans warm and organic.
Care: Soapstone: oil periodically. Slate: seal if water darkens it.
A bright kitchen with white cabinetry and a full-height granite backsplash that matches the countertops. The continuous stone surface creates a seamless, low-maintenance look while showcasing natural movement and warm undertones.
The Specialty Options: When and Why
Metal backsplashes — stainless sheet, brushed aluminum panels, sealed copper or brass — read professional and wipe clean in seconds. Stainless behind a range is genuinely practical: heat-smart, seamless, and zero grout to maintain. The limitation is that metals expand and contract with temperature, so they need appropriate adhesives and tiny expansion gaps at edges. A beautiful copper or brass accent band behind a range hood is one of our favorite "small area, big moment" moves.
Wood and wood-look options divide cleanly into appropriate and inappropriate uses. Real wood — sealed butcher block, reclaimed planks, tongue-and-groove — belongs in dry zones: coffee bars, open shelf areas, areas away from direct splash and steam. It should be sealed on all sides, including the back. Wood-look porcelain gives you all the visual grain with none of the moisture worry, and it's what we spec for actual splash zones when a client has their heart set on the look.
Peel-and-stick and vinyl sheet are genuinely useful in one situation: a rental or a short-term solution where you're not investing in the permanent finish. They're not a long-term answer for a primary kitchen. The adhesive degrades near heat sources, edges lift over time, and they rarely hold up as long as the marketing suggests. If it's a rental — great call. If it's your forever kitchen — spend the money on real tile.
Pattern and Layout: How to Get It Right
Pattern is where people overthink and where installers pay the price. The single most important rule: center your pattern on the focal element — the range, the sink, the hood — and work outward. Skinny cut tiles at the center of the cooktop wall look like a mistake even when they aren't one. Skinny cuts at the corners and edges, where the eye doesn't go, are completely acceptable.
Stacked (Straight Set)
Tiles aligned horizontally and vertically. Clean, modern, and forgiving. The easiest lay pattern to install correctly, which matters because correct installation is where most patterns either succeed or fail. Works with almost any tile format.
Running Bond (Brick Offset)
The classic subway tile pattern — each row offset by half a tile. Timeless because it genuinely works at any scale. Vertical running bond (stacked sideways) adds height in low-ceiling rooms and has become increasingly popular in narrow Rossmoor galley kitchens for exactly that reason. One note: standard 1/3 offset is more stable than 50% offset for large-format tiles — ask your installer.
Herringbone
High visual impact using standard rectangular tile. The "V" pattern draws the eye and makes a short backsplash feel taller. Order 10–15% extra for the angle cuts — more than you think you'll need. A herringbone band behind the range on an otherwise calm field tile wall is one of the most consistently successful design moves we make: focused drama, controlled cost.
Hexagon and Small-Format Mosaics
Small-scale patterns — hex, basketweave, penny round — add texture and rhythm without the boldness of a large patterned tile. They hide splatter well because there's no large continuous surface for grease to read against. The tradeoff is grout: more tile edges mean more grout joints, and more grout joints mean more sealing and more maintenance over time. Tone-on-tone grout — grout close in color to the tile — minimizes both the visual busyness and the maintenance burden.
Toupin TipThe "focal wall vs. field tile" approach is the most reliable way to get pattern right without overdoing it. One area — usually behind the range or range hood — gets the interesting tile: herringbone, mosaic, patterned, or a special material. The rest of the backsplash runs a simple field tile. You get the moment without the sensory overload, and the installation is manageable. This is what we recommend when clients bring us a pile of inspiration photos and can't choose between them.
"Center your pattern on the focal element — range, sink, hood — and work outward. Skinny cuts at the center look like a mistake. Skinny cuts at the edges are invisible."
Grout: The Decision Everyone Makes Last and Regrets First
If there's one thing I could get every homeowner to understand before they choose a backsplash, it's this: the grout is not a finishing detail. It's half the visual result. White tile with dark grout is a completely different backsplash than white tile with white grout. And stark white grout in a busy kitchen is a maintenance commitment that most people are not ready for when they're looking at it in a showroom.
The Grout Decisions That Actually Matter
Color: Mid-tone or color-matched grout hides everyday life better than stark white. Near the sink especially — remember the hard water conversation — a medium gray or warm cream grout will look better longer than brilliant white. If you love the clean look of white grout, use it on the backsplash above the countertop where it doesn't take direct splash. Go darker at the counter seam.
Width: Narrower grout joints (1/16" to 1/8") read cleaner and have less surface to accumulate grime. Wider joints (3/16"+) are appropriate for handmade and irregular tiles that need the room. Your tile and your installer's recommendation should align on this — don't let either drive the decision alone.
Type: Epoxy grout is harder, stain-resistant, and doesn't need sealing — but it's more difficult to work with and nearly impossible to change later. Cement-based grout is more forgiving to install and regrout, but needs sealing. In kitchens, we typically use a high-quality cement grout with a good sealer, reapplied every few years. For high-demand areas, epoxy is worth the conversation.
East Bay note: With our moderately hard water, seal all cement grout at installation — don't skip it. Mineral deposits accumulate faster in grout joints than on the tile surface itself, and it's far easier to prevent than to remove once it's built up.
Room by Room: Where the Focus Goes
Not every backsplash decision is a kitchen one, and the right call differs significantly by room.
| Room | Primary Challenge | Material Call | What We See Work Best |
|---|---|---|---|
| Kitchen — behind range | Grease, heat, steam | Porcelain, ceramic, stainless, sealed stone | Large-format porcelain slab or herringbone ceramic — fewer grout lines, fast cleanup |
| Kitchen — behind sink | Water, soap, mineral deposits | Non-porous material; avoid light grout | Porcelain or glass with mid-tone grout; wipes clean without staining |
| Bathroom vanity | Toothpaste, soap, daily water splash | Ceramic, glass, sealed stone | 10–12" height is often sufficient; glass or porcelain for fastest daily wipe-down |
| Laundry room | Detergent splash, humidity | Ceramic or porcelain; nothing porous | Simple ceramic tile — functional and replaceable; save the tile budget for rooms you see more |
| Mudroom / bar sink | Impact, grime, frequent wiping | Durable ceramic or porcelain | Ceramic with dark grout; takes abuse without showing it |
| Rossmoor specifically | HOA approvals, limited venting | Any material — but check scope changes first | If changing hood height or appliance type, verify Mutual + City of Walnut Creek requirements before ordering tile |
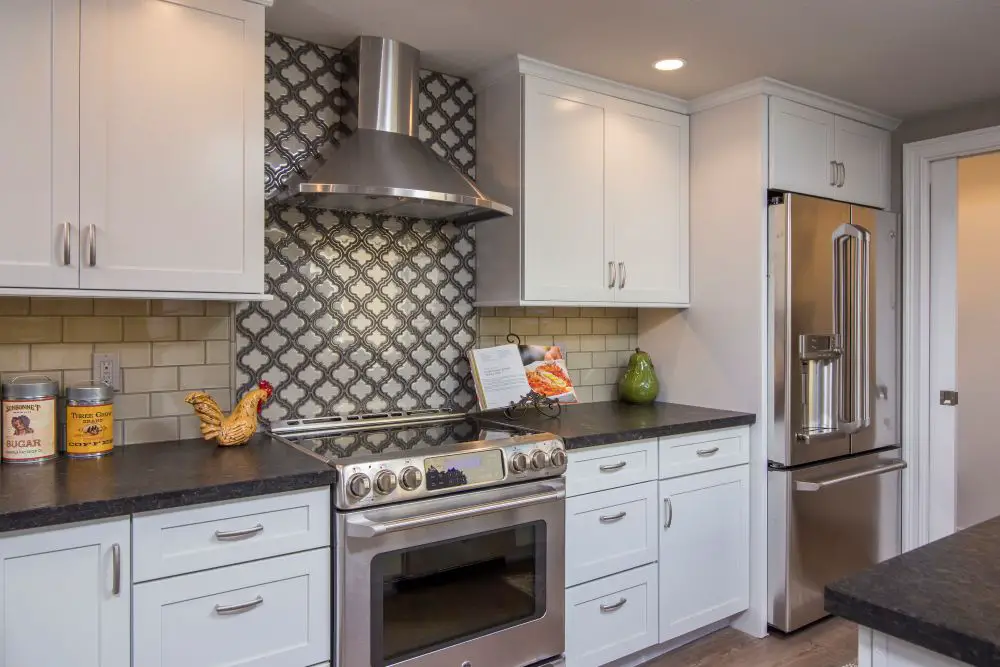
A classic kitchen with white cabinetry featuring a combination backsplash design—neutral subway tile paired with a decorative patterned inset behind the range. This layered approach adds visual interest while maintaining a clean, timeless look.
Countertop Pairings: The Combinations That Consistently Work
The backsplash doesn't live in isolation — it lives against your countertop, your cabinets, and your wall color. The combinations that work reliably follow one principle: if one element is busy, the other should be calm.
Busy veined stone countertop × simple cream ceramic backsplash
Plain white quartz countertop × patterned or colored tile backsplash
Butcher block countertop × clean white square tile — classic, always works
White quartz with gray veining × sea-glass or soft green tile
Concrete-look countertop × warm sand-tone porcelain — avoids "all industrial"
Warm Calacatta marble countertop × simple zellige in a cream or warm white
The pattern extends to cabinets too. Dark navy or green cabinets generally want a lighter, simpler backsplash — the cabinets are already the statement. White or light cabinets can take a more interesting tile because the canvas is quieter. And if you're working with refaced cabinets in a new color, make sure the backsplash decision happens after or alongside the cabinet color decision, not before.
Budget: Where to Spend and Where to Save
Backsplash costs range from under $5 per square foot for basic ceramic to $40+ per square foot for natural stone — and that's before labor. Labor on a complex pattern like herringbone or mosaic can be 50–100% more than labor on a straight-stacked field tile. Here's the honest framework:
Smart Save
Field Tile + Feature Moment
Run an affordable ceramic or porcelain field tile. Spend your budget on a focused feature area — behind the range, under the hood — using a more interesting material. You get the visual payoff at a fraction of the cost of tiling everything in a premium material.
The Sweet Spot
Mid-Range Material, Full Run
A quality porcelain or ceramic in a format and finish you love, run the full backsplash. This is where most of our East Bay projects land — enough material quality and design flexibility to get a result you'll be happy with for fifteen years without a premium material premium.
Worth It When
Natural Stone or Full Slab
Natural stone or a continuous porcelain slab (countertop to ceiling) earns its cost in a kitchen that will be photographed, shown, or lived in for a very long time. The maintenance commitment is real and needs to be part of the conversation. Spend here with eyes open, not because it photographs well.
Toupin TipAlways buy 10% more tile than your square footage calculation says you need — 15% for diagonal or herringbone patterns. Dye lots vary between production runs, and if you need to replace a damaged tile two years from now from a different batch, the color match will be close but not exact. The extra tile costs almost nothing relative to the job and saves real headache later. Store it flat, in a dry place, labeled with the color and formula.
What the Installation Actually Involves
A backsplash is one of the more accessible tile projects — the scale is manageable and it's not structural. But "accessible" doesn't mean "simple," and the details that get skipped are always the ones that show up later.
Outlets are the most common gotcha. Tile changes the wall depth, which means outlet boxes that were flush are now recessed. Box extenders bring them back to flush and keep the installation code-compliant — GFCI outlets are required within 24 inches of a sink and at regular intervals along kitchen counters. The tile cuts around outlets need to be precise; a sloppy cut around an outlet box is the first thing anyone notices when they look at a finished backsplash.
Edge finishing matters equally. Any exposed tile edge — where the backsplash meets a wall that doesn't get tile, or where it terminates at a window or cabinet side — needs a trim piece or a bullnose tile to finish cleanly. A raw tile edge with sanded corners is a sign of an unfinished job, and it's also a place where moisture gets in.
Under-cabinet lighting, if you have it or are planning it, should be decided before the backsplash goes in — not after. The LED strip position relative to the tile affects what the tile looks like lit. LEDs positioned toward the front of the cabinet cast light forward onto the countertop; LEDs positioned toward the back rake light across the tile and emphasize texture. Both are valid. But changing the position after the tile is up means moving electrical, which means patching, which means matching a discontinued tile. Plan the lighting first.
For a deeper look at how we approach tile installation on full kitchen and bathroom remodels, visit our tile and floors service page.
Want a Second Set of Eyes on Your Backsplash?
We design and install in Walnut Creek, Rossmoor, Lafayette, Orinda, Danville, and across the East Bay. Bring us your kitchen dimensions, your countertop, and your cabinet color — and we'll shortlist three to five options that actually work for your space and how you cook. No guessing, no Pinterest spiraling.
Get a Free ConsultationOr call: 925-937-4200 · CA Lic #626819
Toupin Construction
Ready to start your remodel?
Whether you're dreaming of a new kitchen, a spa-worthy bathroom, or a whole-home transformation — we’d love to hear about your project. Reach out and let's talk.
‹ Back
Comments